Facebook Instagram Pinterest Twitter

Glamumous

  • Home
  • About
  • Contact
  • Disclosure/Privacy
  • Media

Sending a handwritten thank you card is a wonderful way to show appreciation for a thoughtful gift, for helping out over the festive season, or to a person who has helped make these busy few weeks seem special.

Below you will find my favourite free printables to express your thanks. These range from elegant to modern, with a few themed for children thrown in the mix. You might also like to check out my [previous post] for even more inspiration.

Two simple designs from Delia Creates


Delia Creates has created two simple typographic designs, which as you can see in the preview above, can be printed on different coloured and textured card stock according to your stash and the recipient's preference.

Kids Arctic Thank You Cards from Lia Griffith


Lia Griffith has created a pretty winter-themed thank you card for kids in two styles: one which is blank, and the other with prompts (which is perfect for younger children). You'll need to register your email address to download this printable for free from Lia's site, but it's well worth it for the quality of her designs.

Melissa Esplin Printable Thank You Set


This beautiful set from Melissa Esplin features three different types of cards (for both children and adults) along with a printable envelope. 

Festive Red Thank You Card from Lemon Squeezy

A beautiful bright thank you card printable from Lemon Squeezy.

Grey and Red Thank You Cards from Sisters What


These two designs from Sisters What are elegant yet festive, and would also look fantastic printed on kraft card stock.

Stylish Thank You Card from More Thank You Notes


More Thank You Notes offers this stylish printable for free download. (Hint: there are many more themed printables available on this useful site!). 

Small Deer Cards from Living Locurto


These adorable, small-sized deer cards were designed by Living Locurto to fit inside small Kraft envelopes, and are particularly handy for when you need to write lots of cards. 

Polar Bear Cards and Tracker from Tots Family

Tots Family created these adorable Polar Bear cards with children in mind, accompanied by a free printable tracker to ensure your children keep track of their notes. 

Beautiful Cards and Tags from Design Create Cultivate

I really like this printable design from Design Create Cultivate, which also includes small tags. 

Cute Minnie Mouse Cards from Disney Family


Although I know these cards from Disney Family are intended for younger writers... But they are so cute, I'll be printing a set out to use myself! 

Which of these designs will you choose to print, or have I missed out a favourite of your own? Please feel free to leave your comments and suggestions below.

Photo credit (top image): s3aphotography, via Flickr
Share
Tweet
Pin
Share
No comments

Our best wishes from our home to yours for this holiday season!
Share
Tweet
Pin
Share
1 comments


It's during the holiday season that many of us recall most fondly the traditions formed by those who have passed from our lives. My paternal nannan, Joan, would spend days baking and creating gifts for family members from her kitchen.

I remember the crumbly pastry of her tarts and mince pies, the jam roly-poly she would serve hot with custard, and how her house always smelled of sweetness and spice when she knew her grandchildren were on their way.

Most of all, when the nights draw cold, I recall the comforting taste and texture of her date and walnut loaf. Rich and moist with just a little crunch, it paired wonderfully with a small glass of her homemade Irish Cream liqueur (which as Dad still attests, was far superior to anything you can buy in a store).

A few days ago, Dad and I were reminiscing about Nannan Joan and how busy she would be in the weeks leading up to ChristmasDay. Though we were unable to find any written details of her recipes (for she knew all of the details by heart and measured by eye), I felt compelled to try and recreate a date and walnut cake in her honour.

For this recipe, I wanted to try and create the cake using a decorative bundt tin, as the finished cake is firm and heavy enough to hold the shape well. If you don't have a bundt tin to hand, you could recreate this recipe in a small loaf tin instead, being careful to check periodically after the first hour if the cake has already cooked.


Ingredients:

  • 150g of stoned, dried dates, chopped
  • 25 g unsalted butter
  • Just under 1tsp bicarbonate of soda
  • 200 ml boiling water
  • 100 g (5 oz) light muscovado sugar
  • 2 medium eggs
  • 220 g plain flour
  • 1 1/2 tsp baking powder
  • 1tsp ground mixed spice
  • 1/2 tsp cinnamon
  • pinch of salt
  • 100g of walnuts, finely chopped
  • Optional: A little icing sugar, to decorate

Method

  1. Place the dates in a bowl with the bicarbonate of soda and the butter. Pour over the boiling water and stir until all of the butter has melted (this should take only a minute or two). The water will begin to turn a rich brown colour. Set the mixture aside to cool, and to allow the dried dates to plump up.
  2. Preheat your oven to 180ºC (350ºF, Gas Mark 4).
  3. Grease a 7 inch deep bundt tin by using either cooking oil spray, or oil applied with a folded piece of kitchen roll. Be sure to get inside all of the grooves and pay particular attention to the base (which will become the "top" of the cake when finished). 
  4. In a large bowl, beat the sugar and eggs together until they are combined. Next, add the cooled date mixture and stir well.
  5. Sift in the flour, baking powder, mixed spice, cinnamon and salt, while folding the mixture gently. 
  6. Finally, add the chopped walnuts and ensure all ingredients are thoroughly combined. 
  7. Pour the mixture into your prepared tin and ensure the top is level. You're likely to need a flexible spatula to fully extract this sticky mixture from your bowl.
  8. Bake for approximately 1 hour and 15 minutes, or until the cake has risen and browned nicely on top. Be sure that a skewer inserted into the cake comes out clean. When using bundt tins, I've found that the area closes to the "inner ring" takes longer to cook than the edges, so be sure to check here even if a skewer inserted in the centre of the ring comes out clean. 
  9. When using a bundt tin, it's really important to ensure the cake has cooled sufficiently before attempting to turn it out. This is because the cake will contract slightly once cooled, allowing you to turn it out more easily. When turning it out onto a wire rack, use the back of a wooden spoon to tap the base. If needed, a slightly greased flat knife slipped around the lip of the pan should loosen it more. 
  10. Optional: use a sieve to dust the top of the cake and enhance the pattern formed by the tin.


Prep time: 20 minutes

Cook time: 1:15

Total time: 1:35

Yield: 10

Once cooled, serve in slices just under an inch thick. It's also delicious lightly toasted with a spread of butter. This cake is moist and rich, and can be frozen or kept in a sealed container for around 5 days.


I hope you enjoy this recipe as much as we did. Please feel free to tell us your own experiences in the comments section below. 
Share
Tweet
Pin
Share
2 comments

Christmas shopping provided a glutton of gloriously scented clementines. Traditionally, oranges were given as gifts and placed in the foot of a stocking. Though this tradition harks back to less prosperous times when fresh fruit was considered a rare and expensive treat, it is also steeped in festive legend.

During his lifetime, Saint Nicholas was a bishop whose generosity to give while expecting nothing in return appears to have inspired our practice of gifting at Christmas. The legend tells us that he was travelling through a village where a widowed father was troubled that he could not afford dowries for his three beautiful daughters. Saint Nicholas, upon hearing of the poor widower's plight, knew the man would be too proud to accept money as a gift. Instead, he threw three bags of gold down chimney of the family home, under the cover of night. One of the bags caught a stocking which had been hung to dry on the fireplace, which overnight hardened into a ball of gold, now symbolised by the vibrant colour of oranges in our modern homage to the legend.

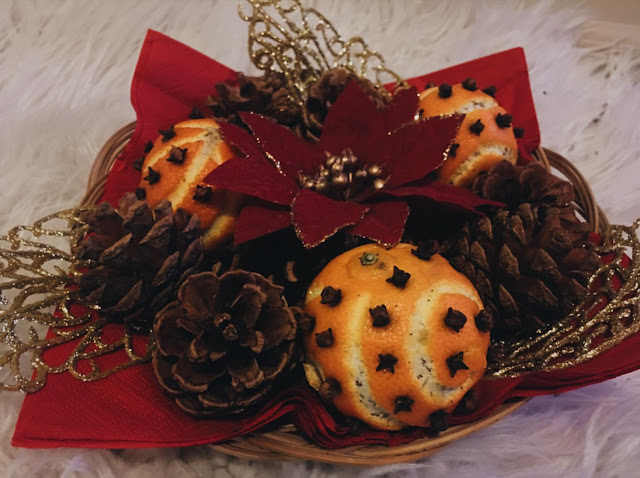
Since today is the Winter Solstice (just four sleeps away from the big day), my daughter and I decided to decorate a few as pomanders to scent our home and dinner table centrepiece. Here's how to make your own.

What you will need:


  • Firm citrus fruits (we used clementines, but you could just as easily use oranges or grapefruits)
  • A jar of whole cloves
  • (Optional) Cocktail sticks or a thin nail, to pierce the skin
  • A citrus zester or vegetable peeler
  • (Optional) Ribbon or baker's twine, if you want to hang your finished pomanders

Instructions


  1. Using the corner of your citrus zester (or the corner of a vegetable peeler, though this will create wider lines), carve a design into the skin of your fruit. Be sure to apply a light touch, so as not to expose the fruit inside. For our designs, we used a combination of swirls and lines.
  2. Once you've finished scoring your design, push whole cloves into the gaps of your design. We've found that more cloves not only provide a stronger scent, but allow the fruit to dry out faster, giving them a longer shelf life. Using a cocktail stick or thin nail to break tough citrus skin can help you push in the cloves more easily.
  3. To finish, you could arrange your pomanders in a bowl or on a plate, using greenery, fir cones or other festive to decorate. If you would like to hang your pomanders, wrap a ribbon or colourful baker's twine around the outside and tie a loop at the top. 


Unfortunately, pomanders don't usually have a long shelf life and may become mouldy. You may want to display them for only a few hours each day, refrigerating between sessions to prolong their life and scent. Alternatively, hang them in a cool dry place to enable the flesh to completely dry out.

We hope you will enjoy making your own spiced pomander balls! If you have any tips to prolong the life of these festive treats, please feel free to share in the comments below.

Share
Tweet
Pin
Share
No comments
Newer Posts
Older Posts

Popular Posts

  • 101 Household Tips for Every Room in your Home
  • 65 Genius Gift Ideas to Make at Home
  • All Mothers are Slightly Insane
  • How to Celebrate World Book Day
  • The Great Big List of Pregnancy Freebies

Follow Us

  • Facebook
  • Instagram
  • Pinterest

Labels

Family Housekeeping Well Being Community Food and Recipes Book Reviews

recent posts

Get new posts by email:

Archives

  • ►  2022 (1)
    • ►  January (1)
  • ►  2021 (7)
    • ►  December (6)
    • ►  November (1)
  • ►  2020 (1)
    • ►  October (1)
  • ►  2019 (8)
    • ►  March (4)
    • ►  February (3)
    • ►  January (1)
  • ▼  2018 (4)
    • ▼  December (4)
      • 10 Gorgeous Free Thank You Printables
      • Merry Christmas from Glamumous!
      • Date and Walnut Bundt Cake Recipe
      • Making Spiced Clementine Pomander Balls
  • ►  2014 (15)
    • ►  April (1)
    • ►  March (3)
    • ►  February (6)
    • ►  January (5)
  • ►  2013 (80)
    • ►  December (8)
    • ►  May (10)
    • ►  April (14)
    • ►  March (18)
    • ►  February (15)
    • ►  January (15)
  • ►  2012 (9)
    • ►  December (3)
    • ►  October (3)
    • ►  August (2)
    • ►  January (1)
  • ►  2011 (31)
    • ►  December (1)
    • ►  November (1)
    • ►  June (1)
    • ►  May (10)
    • ►  April (16)
    • ►  March (2)
  • ►  2009 (55)
    • ►  June (10)
    • ►  May (17)
    • ►  April (13)
    • ►  March (7)
    • ►  January (8)
  • ►  2008 (2)
    • ►  September (1)
    • ►  April (1)
  • ►  2007 (116)
    • ►  December (2)
    • ►  November (16)
    • ►  October (4)
    • ►  September (7)
    • ►  August (3)
    • ►  July (20)
    • ►  June (29)
    • ►  May (28)
    • ►  April (6)
    • ►  March (1)
Facebook Twitter Instagram Pinterest Bloglovin

Created with by BeautyTemplates